Monday, December 07, 2009

Kindle (my first month) and a gotcha

It has now been almost a month since I acquired my Kindle2 reader from Amazon. I wanted to take the opportunity to jot down some thoughts as well as a gotcha and a workaround that I came across.

First, as I mentioned in a earlier post Amazon has a huge library of books for the reader, but more important for me is the availability of a huge selection of technology books (programming, Sharepoint, Windows, Linux, etc.).  With  this library available to me on my Kindle (at a cheaper price than the bound book), I can take them with me to read when traveling or out and about.  Sony and B&Ns readers have a decent library available to them, but technology books are either non-existent or very minimal.

Next, the eInk technology used by the Kindle is great.  It makes the text very readable and easy on the eyes.  The ability to change the font size is a benefit for someone with bad eyes, like me.  Now, comes the interesting and magical part of the Kindle. When I was reading bound books (Fiction primarily), the story would enter a boring or no action sequence about halfway through the chapter.  During these times, I would look at how many pages were left in the chapter that I had to get through before the story picked up again.  I would do this every couple of paragraphs. Painful. With the Kindle, the same boring and non-active dialog is easier to get through for some reason.  I haven't quite figured this out yet, but something about reading the book on the Kindle makes the boring content easier to digest.  Maybe I am just giddy over technology and that is was makes it easier.  I don't know.

A word of caution, especially for those considering reading technology books on the Kindle. If the book you are looking to read on the device is a coding book with code samples or complete code write-ups, be aware that code blocks do not adjust font size as well as the other text in the books.  I have run into this in a couple of books.  The issue is when there are large code blocks.  The Kindle wants to maintain some consistency and not unnecessarily break up the text to make it disjointed.  This cause the code text to not allow for font sizing.  Fortunately, most authors and publishers provide smaller code snippets in the chapters and provide complete code in an appendix, which brings me to another great feature.

The Kindle brings with it the ability to synchronize bookmarks, notes, and position.  This allows me to set a bookmark or last page I was reading on the Kindle and synchronize it automatically with either another Kindle or perhaps Kindle for PC of Kindle for IPhone.  Speaking of Kindle for PC. The code issue mentioned above is not so much of an issue when viewing through Kindle for PC due to having a higher resolution screen available on the PC to view the same information.

The latest firmware for the Kindle (2.3 at the time of this writing) has enabled native PDF support in the Kindle2.  This was previously available in the Kindle DX and as an experimental item on the earlier Kindle2 firmware.  This allows me to copy various PDF files onto my Kindle via a USB connection on my PC.  Books from O'Reilly that I purchase and download as eBooks are typically what I have been loading up with along with other PDF goodies I find while searching.  The downside to using PDFs is that position, bookmarks and notes are not available.  Of course, this just makes sense because Kindle does not "own" the content and is not configured to mark this data.

Now, for the gotcha. When loading PDF files to the Kindle, we can either copy them via USB or we can send them to the Kindle via e-mail.  The problem with most of the PDFs I load up is that they are too large for most e-mail clients to send.  I realize and am OK with this, so I just copy them via USB.  My first attempts at this was less than successful. Hooking the Kindle up to the PC is simple enough.  Once connected, it shows up as drive K:(K for Kindle).  Kind of funny how Amazon statically assigns that drive letter unless it is already taken by something else.  Anyway, when I try to copy documents over to the Kindle (.mobi, .PDF, etc.) the USB connection with the Kindle is reset and I get an incomplete file copy.  On my desk, I have a USB hub (1000-n-1 card reader) type thing. This is connected to my PC which sits under the desk.  I plug my Palm Pre, iPod Touch, other MP3 players, flash drives, etc into this. Not all at the same time, but when I need to sync or move data. I have never had any problems with these other devices. With the Kindle2, as I copy the files, the connection resets.  I decided based on the reaction of the Kindle and PC, to plug the Kindle directly into the USB port on the PC rather than through the hub.  File copies started working as I would expect them to.  It would appear that the Kindle pulls up the power and current requirements on the USB port when a transfer begins (writing to Kindle).  I have not tried this with a powered USB hub, but perhaps that would work since it is applying based power and can provide power to counter the draw from the Kindle during the write process.

Friday, October 23, 2009

Hyper-V Automation through scripts (Final Script)

Ok, so far we have created, modified, and added resources (memory, processor, disks, and network) to virtual machines.  Now, we want to take that information and build a complete virtual machine.

# Set up variables
$VHD = "f:\VHDs\win2k8.vhd"
$GuestVM = "Win2k8"
$Namespace = "root\virtualization"
$Computer = "HyperV"
$VHDSize = "10GB"
$VMSwitchName = "Hyper-V External Switch"
$VMSwitchPortName = "MyPort"
$VMNICAddress = "00155D9290FF"

$VMSvc = Get-WmiObject -class "Msvm_VirtualSystemManagementService" -namespace $Namespace -ComputerName $Computer
$VM = Get-WmiObject -Namespace $Namespace -ComputerName $Computer -Query "Select * From Msvm_ComputerSystem Where ElementName='$GuestVM'"
$VMSettingData = Get-WmiObject -Namespace $Namespace -Query "Associators of {$VM} Where ResultClass=Msvm_VirtualSystemSettingData AssocClass=Msvm_SettingsDefineState"

# Give the new virtual machine a name
$VMGlobalSettingClass = [WMIClass]"\\$Computer\root\virtualization:Msvm_VirtualSystemGlobalSettingData"

$NewVMGS = $VMGlobalSettingClass.psbase.CreateInstance()

while ($NewVMGS.psbase.Properties -eq $null) {}

$NewVMGS.psbase.Properties.Item("ElementName").value = $GuestVM

# Create  a virtual disk
$VMDiskSvc = Get-WmiObject -Class "Msvm_ImageManagementService" -Namespace "root\virtualization"

$DiskCreate = $VMDiskSvc.CreateFixedVirtualHardDisk($VHD, 10GB)
$DiskJob = [WMI]$DiskCreate.job

while (($DiskJob.JobState -eq "2") -or ($DiskJob.JobState -eq "3") -or ($DiskJob.JobState -eq "4")) {Start-Sleep -m 100 $DiskJob = [WMI]$DiskCreate.job}

#Create memory resource
$VMMem = (Get-WmiObject -Namespace $Namespace -Query "Associators of {$VMSettingData} Where ResultClass = Msvm_VirtualSystemSettingDataComponent" | where-object -FilterScript {$_.ResourceSubType -eq "Microsoft Virtual Machine Memory"})

$VMMem.VirtualQuantity = [string]2048
$VMMem.Reservation = [string]2048
$VMMem.Limit = [string]2048

# Create processor resource
$VMProc = (Get-WmiObject -Namespace $Namespace -Query "Associators of {$VMSettingData} Where ResultClass = Msvm_ProcessorSettingData" | where-object -FilterScript {$_.ResourceSubType -eq "Microsoft Processor"})

$VMProc.VirtualQuantity = [string]1
$VMProc.Reservation = [string]0
$VMProc.Limit = [string]100000
$VMProc.Weight = [string]100

# Create network interface
$DefaultNet = Get-WmiObject -Namespace $Namespace -Class Msvm_SyntheticEthernetPortSettingData | Where-Object -FilterScript {$_.InstanceID -like "*Default*"}

$GUID1 = [GUID]::NewGUID().ToString()
$GUID2 = [GUID]::NewGUID().ToString()

$VMSwitchQuery = Get-WmiObject -Class "Msvm_VirtualSwitchManagementService" -Namespace $Namespace

# $VMSvc = Get-WmiObject -Class "Msvm_VirtualSystemManagementService" -namespace $Namespace -ComputerName $Computer

$VMSwitch = Get-WmiObject -Namespace $Namespace -Query "Select * From Msvm_VirtualSwitch Where ElementName = '$VMSwitchName'"

$ReturnObject = $VMSwitchQuery.CreateSwitchPort($VMSwitch, [guid]::NewGuid().ToString(), $VMSwitchPortName, "")
$NewSwitchPort1 = $ReturnObject.CreatedSwitchPort

$ReturnObject = $VMSwitchQuery.CreateSwitchPort($VMSwitch, [guid]::NewGUID().ToString(), $VMSwitchPortName, "")
$NewSwitchPort2 = $ReturnObject.CreatedSwitchPort

$StaticNet = $DefaultNet.psbase.Clone()
$StaticNet.VirtualSystemIdentifiers = "{GUID1}"
$StaticNet.StaticMacAddress = $true
$StaticNet.Address = $VMNICAddress
$StaticNet.Connection = $NewSwitchPort1

$DynNet = $DefaultNet.psbase.Clone()
$DynNet.VirtualSystemIdentifiers = "{GUID2}"
$DynNet.Connection = $NewSwitchPort2

#Add the network interface resources to Resource Allocation Settings
$VMRASD = @()

$VMRASD += $StaticNet.psbase.gettext(1)
$VMRASD += $DynNet.psbase.gettext(1)
$VMRASD += $VMMem.psbase.gettext(1)
$VMRASD += $VMProc.psbase.gettext(1)

# Time to create the virtual machine
$VMSvc.DefineVirtualSystem($NewVMGS.psbase.GetText(1), $VMRASD)

# Add our disk to the virtual machine
# $VM = Get-WmiObject -Namespace $Namespace -ComputerName $Computer -Query "Select * From Msvm_ComputerSystem Where ElementName = '$GuestVM'"

# $VMSettingData = Get-WmiObject -Namespace $Namespace -Query "Associators of {$VM} Where ResultClass = Msvm_VirtualSystemSettingData AssocClass = Msvm_SettingsDefineState"

$VMIDECtrl = (Get-WmiObject -Namespace $Namespace -Query "Associators of {$VMSettingData} Where ResultClass = Msvm_ResourceAllocationSettingData AssocClass = Msvm_VirtualSystemSettingDataComponent" | where-object -FilterScript {$_.ResourceSubType -eq "Microsoft Emulated IDE Controller" -and $_.Address -eq 0})

$DiskAllocationSetting = Get-WmiObject -Namespace $Namespace -Query "Select * From Msvm_AllocationCapabilities Where ResourceSubType = 'Microsoft Synthetic Disk Drive'"

$DefaultDiskDrive = (Get-WmiObject -Namespace $Namespace -Query "Associators of {$DiskAllocationSetting} Where ResultClass = Msvm_ResourceAllocationSettingData AssocClass = Msvm_SettingsDefineCapabilities" | where-object -FilterScript {$_.InstanceID -like "*Default*"})

$DefaultDiskDrive.Parent = $VMIDECtrl._Path

$DefaultDiskDrive.Address = 0

$NewDiskDrive = ($VMSvc.AddVirtualSystemResources($VM._Path, $DefaultDiskDrive.PSBase.GetText(1))).NewResources

$DiskAllocationSetting = Get-WmiObject -Namespace $Namespace -Query "Select * From Msvm_AllocationCapabilities Where ResourceSubType = 'Microsoft Virtual Hard Disk'"

$DefaultHardDisk =  (Get-WmiObject -Namespace $Namespace -Query "Associators of {$DiskAllocationSetting} Where ResultClass = Msvm_ResourceAllocationSettingData AssocClass = Msvm_SettingsDefineCapabilities" | where-object -FilterScript {$_.InstanceID -like "*Default"})

$DefaultHardDisk.Parent = $NewDiskDrive
$DefaultHardDisk.Connection = $VHD

$VMSvc.AddVirtualSystemResources($VM._Path, $DefaultHardDisk.PSBase.GetText(1))

#Now, we add a DVD
$DVDAllocationSetting = Get-WmiObject -Namespace $Namespace -Query "Select * From Msvm_AllocationCapabilities Where ResourceSubType = 'Microsoft Synthetic DVD Drive'"

$DefaultDVDDrive = (Get-WmiObject -Namespace $Namespace -Query "Associators of {$DVDAllocationSetting} Where ResultClass = Msvm_ResourceAllocationSettingData AssocClass = Msvm_SettingsDefineCapabilities" | where-object -FilterScript {$_.InstanceID -like "*Default"})

$DefaultDVDDrive.Parent = $VMIDECtrl._Path

$DefaultDVDDrive.Address = 1

$NewDVDDrive = $DefaultDVDDrive.psbase.Clone()

$VMSvc.AddVirtualSystemResources($VM._Path, $NewDVDDrive.psbase.GetText(1))

In this code, I am using a data array to contain all of the resources that will be used to create the virtual machine.

$VMRASD = @()

$VMRASD += $StaticNet.psbase.gettext(1)
$VMRASD += $DynNet.psbase.gettext(1)

You will notice that the hard disk and DVD drive are not included in this array.  This is because they are added to a virtual IDE port.  These ports do not exist until after the virtual machine is created, so we add them after it is.

That wraps up this session for automating Hyper-V virtual machine creation through scripts.  As always, any comments or questions, let me know.

AAAAHHHHHH!

Just when I think I have decided on the right eBook reader for me, another one comes out with bigger and better features that made me revisit my earlier research.

First, I looked through several readers, but it really came down to Sony's and Amazon's readers.  These fell into my <$300 requirement and size, screen clarity, etc.  You know, all the things that make reading enjoyable.  In the end, I decided that I would lay down for the Kindle from Amazon.  Having Amazon lower the price on the non-DX model didn't hurt either.

Now comes the dilemma.  Barnes and Noble looks to be readying a release of their reader that they have unfortunately named 'Nook'.  A name is a name, so no big deal.  This appears to boast a color touchscreen, LendMe technology, a million books in the catalog, a replaceable battery, and it runs on Android.  These are a few of the features, but you can read more about the Nook at the Barnes & Noble site.

So, with me getting ready to purchase a reader, I needed to review what was important and how each product met the requirements.....again.  So, here goes.....

For me the color touchscreen is cool, but not a functional deal-maker.  There was not enough information that I could find on how it handles fingerprints and everyday use.  The LendMe technology is pretty cool in being able to let a friend borrow one of your ebooks for 2 weeks I believe.  I also think this carried over to the other readers from Barnes & Noble (iPhone/iPod, Blackberry, Mac, PC).  The replaceable battery is a nice option, but with a life expectancy of 2-3 years, I will probably upgrade to something else by then.  And, Android, is well, it's Android. I could care less about the underlying OS, as long as it does what I need it to.

This brings me to the one million books catalog.  The book count includes the myriad of books available through Google Books.  Not very beneficial to me.  Also, the Barnes & Noble ebook catalog has absolutely zero computer books.  For me, being an IT guy with tons of books on varying IT subjects, I was hoping to have at least of glimpse that there was a future in having them become available at some point.

Comparing this to the Amazon Kindle.....Amazon has a very large library of books available in the Kindle format.  These include a large selection of computer related books.  Many other categories and selections of books are available through Amazon for the Kindle.  This large library selection alone is really enough for me to settle on the Kindle, but I will point out a few other items.

First, like the Kindle, the Nook gets access to a wireless network for delivery of books.  The problem here is that the Nook uses the crappy AT&T cellular (3G, if you're lucky) network.  No guarantees that the book will be delivered because someone forgot to feed the mouse that runs their cell network.  Look at the challenges AT&T has with iPhones and pretty much any other phone on the network.  The Kindle uses the Sprint network for its' connectivity.  Sprint is not perfect either, but at least they know where the problems are at.  For me, it is about knowing the limitations versus assuming everything is 100%.

The Kindle is a tested product with a lot of users.  Many reviewers state that they wish it could do this or do that, but none are looking to exchange it for something else because it complements their reading style so well, which is the reason I am sticking with my decision to purchase the Amazon Kindle.

Thursday, October 22, 2009

Hyper-V Automation through scripts (Network)

Last time I looked at scripting memory resource creating.  Today, I want to look at the final individual component, network resources.  These network resources are virtual network interfaces that are connected to a virtual switch.  A virtual network interface can be connected to a virtual machine, but will not become active until it is attached to a virtual switch.

Let’s dig into the code to perform this network provisioning.

# Set up variables$VHD = "f:\VHDs\win2k8.vhd"

$GuestVM = "Win2k8"

$Namespace = "root\virtualization"

$Computer = "Hyper-V2k8"

# I am assuming the virtual switch and port already exist# created through Hyper-V Manager or through another script$VMSwitchName = "Hyper-V External Switch"$VMSwitchPortName = "VMPort"# Hyper-V uses GUIDs to identify components. Friendly names are only a benefit for admins$VMNICGUID1 = [GUID]::NewGUID().ToString()$VMNICGUID2 = [GUID]::NewGUID().ToString()

# Get instance of the default network interface$DefaultNet = Get-WmiObject -Namespace $Namespace -Class Msvm_SyntheticEthernetPortSettingData | where-object -FilterScript {$_.InstanceID -like "*Default*"}

# Get instance of Msvm_ComputerSystem class$VM = Get-WmiObject -Namespace $Namespace -ComputerName $Computer -Query "Select * From

Msvm_ComputerSystem Where ElementName='$GuestVM'"


# Get instance of Msvm_VirtualSwitchManagementService class$VMSwitchQuery = Get-WmiObject -Class "Msvm_VirtualSwitchManagementService" -Namespace $Namespace

# Get instance of Msvm_VirtualSystemManagementService class$VSMSvc = Get-WmiObject -Class "Msvm_VirtualSystemManagementService" -Namespace $Namespace

-ComputerName $Computer

# Get instance of target virtual switch$VMSwitch = Get-WmiObject -Namespace $Namespace -Query "Select * From Msvm_VirtualSwitch Where ElementName = '$VMSwitchName'

# Create the switch ports$ReturnObject = $VMSwitchQuery.CreateSwitchPort ($VMSwitch, [guid]::NewGuid().ToString(), $VMSwitchPortName, "
")$NewSwitchPort1 = $ReturnObject.CreatedSwitchPort$ReturnObject = $VMSwitchQuery.CreateSwitchPort ($VMSwitch, [guid]::NewGuid().ToString(), $VMSwitchPortName, "")$NewSwitchPort2 = $ReturnObject.CreatedSwitchPort

#Set up the virtual interfaces# I am showing two interfaces, a static and a dynamic addressed model$StatNet = $DefaultNet.psbase.Clone()$StatNet.VirtualSystemIdentifiers = "
{VMNICGUID1}"$StatNet.StaticMacAddress = $true$StatNet.Address = "00155d9290ff"$StatNet.Connection = $NewSwitchPort1

$DynNet = $DefaultNet.psbase.Clone()$DynNet.VirtualSystemIdentifiers = "
{VMNICGUID2}"$DynNet.Connection = $NewSwitchPort2

#set properties and target virtual machine$VSMSvc.AddVirtualSystemResources ($VM._Path, $StatNet.PSBase.GetText(1))$VSMSvc.AddVirtualSystemResources ($VM._Path, $DynNet.PsBase.GetText(1))

That creates our network resources.  Next time, I will take everything and put together a single script that builds a complete virtual machine.

Monday, October 19, 2009

Hyper-V Automation through scripts (Memory)

Last time I looked at building onto our WMI automation script with processor creation.  Today, I want to cover how to add memory resources into the script.  Once again, I will take advantage of the existing patterns for creating this script.

# Set up variables$VHD = "f:\VHDs\win2k8.vhd"

$GuestVM = "Win2k8"

$Namespace = "root\virtualization"

$Computer = "Hyper-V2k8"

# Get instance of Msvm_VirtualSystemManagementService class$VSMSvc = Get-WmiObject -Class "Msvm_VirtualSystemManagementService" -Namespace $Namespace

-ComputerName $Computer

# Get instance of Msvm_ComputerSystem class$VM = Get-WmiObject -Namespace $Namespace -ComputerName $Computer -Query "Select * From

Msvm_ComputerSystem Where ElementName='$GuestVM'"


#Associating Msvm_VirtualSystemSettingData class with $VM$VMVSSD = Get-WmiObject -Namespace $Namespace -Query "Associators of {$VM} Where

ResultClass=Msvm_VirtualSystemSettingData AssocClass=Msvm_SettingsDefineState"


# Define instance of Virtual IDE controller through an association$VMMEM = (Get-WmiObject -Namespace $Namespace -Query "Associators of ($VMVSSD) Where

ResultClass=Msvm_MemorySettingData AssocClass=Msvm_VirtualSystemSettingDataComponent"


| where-object -FilterScript {$_.ResourceSubType -eq "Microsoft Virtual Machine Memory"})

# Define memory resource attributes# set amount of memory (in megabytes)$VMMem.VirtualQuantity = [string]2048# set other attributes that are viewable in Hyper-V manager$VMMem.Reservation = [string]2048$VMMem.Limit = [string]2048

$VSMSvc.ModifyVirtualSystemResources($VM._Path, $VMMem.PSBase.GetText(1))

There you go. Memory has been defined and created for the virtual machine.  Next time, I will add a network resource via WMI.

Friday, October 16, 2009

Hyper-V Automation through scripts (Processor)

Last time I covered automatic Hyper-V through WMI for virtual disks.  Now, I want to cover how to automate the creation of processor resources.  One thing you will notice is that the pattern used to create virtual disks through WMI will be very similar for creating the rest of our resources.  As we figure out how to manipulate settings of virtual machine components, it becomes easier to build a complete script

# Set up variables$VHD = "f:\VHDs\win2k8.vhd"

$GuestVM = "Win2k8"

$Namespace = "root\virtualization"

$Computer = "Hyper-V2k8"

# Get instance of Msvm_VirtualSystemManagementService class$VSMSvc = Get-WmiObject -Class "Msvm_VirtualSystemManagementService" -Namespace $Namespace

-ComputerName $Computer

# Get instance of Msvm_ComputerSystem class$VM = Get-WmiObject -Namespace $Namespace -ComputerName $Computer -Query "Select * From

Msvm_ComputerSystem Where ElementName='$GuestVM'"


#Associating Msvm_VirtualSystemSettingData class with $VM$VMVSSD = Get-WmiObject -Namespace $Namespace -Query "Associators of {$VM} Where

ResultClass=Msvm_VirtualSystemSettingData AssocClass=Msvm_SettingsDefineState"


# Define instance of Virtual processor through an association$VMProc = (Get-WmiObject -Namespace $Namespace -Query "Associators of ($VMVSSD) Where

ResultClass=Msvm_ProcessorSettingData AssocClass=Msvm_VirtualSystemSettingDataComponent"


| where-object -FilterScript {$_.ResourceSubType -eq "Microsoft Processor"})

# Define Processor resource attributes# set number of processors$VMProc.VirtualQuantity = [string]1# set other attributes that are viewable in Hyper-V manager$VMProc.Reservation = [string]0$VMProc.Limit = [string]100000$VMProc.Weight = [string]100$VSMSvc.ModifyVirtualSystemResources($VM._Path, $VMProc.PSBase.GetText(1))

There you are. Adding a virtual processor through WMI using our already established pattern for defining resources.  Next time I will cover adding memory resources.

Thursday, October 15, 2009

I have built my fair share of VMs using both Hyper-V Manager and Virtual Machine Manager 2008 (VMM), but as an engineer, I wanted a way to build multiple VMs without the repetitive clicking involved in doing so within the graphical tools.  Fortunately, Microsoft enabled Hyper-V to be managed through WMI scripting.  With VMM, Microsoft has extended the scripting capability into PowerShell.  For this entry, I will focus on WMI,since I always look to understand what shortcut code is doing behind the scenes.  Much of the PowerShell scripting to accomplish these tasks are shorter than their WMI counterparts, but hide the details that I want to see and understand.

For those that don’t know, WMI is the method used to manage pretty much anything Microsoft has developed that runs under the Windows Operating System, so it is fitting that we can use it to manage Hyper-V as well.  Microsoft has made available several classes in WMI that can be used to manage Hyper-V.  A full listing can be found here.

I will not get into scripting the Hyper-V host server build, but will focus on scripting the virtual machine builds on the host.  See, I am building up VMs all the time and needed a method for lighting them up quickly. Building a host or multiple host servers is nice, but not really what I would use in my scenario.

In Hyper-V, there are four primary components that  make up a virtual machine.  These are virtual disk resources, processor resources, memory resources, and network resources. I will be covering each of these parts separately with a final script that takes everything and merges them into one script that will build a virtual machine for you.

The first thing we need to do before we can play with virtual disks is to create them.  Generally, this is pretty simple with a couple of lines.

$VirtDiskSvc = Get-WmiObject -Class "Msvm_ImageManagementService" -Namespace "root\virtualization" 

$VirtDiskSvc.CreateFixedVirtualHardDisk("f:\VHDs\win2k8.vhd", 20GB)

This gets a handle to the class in the first line and then creates a disk using the CreateFixedVirtualHardDisk method using a size of 20GB and path of f:\VHDs\win2k8.vhd.
If you would like to create a dynamic disk file, just keep the first line, but replace the second line.
$VirtDiskSvc.CreateDynamicVirtualHardDisk("f:\VHDs\win2k8.vhd", 20GB)

This creates a dynamic disk using the specified path and size.  The difference between these two methods is in Fixed, the entire 20GB disk is created.  In dynamic, just the minimal size is created and the virtual disk will autogrow up to the 20GB maximum size.
Finally, Hyper-V supports differencing, which uses a base disk and writes any changes to a differencing disk.  There are a couple of additional lines that need to be run to support this.
$VirtDiskPath = "f:\VHDs\win2k8-diff.vhd"

$VirtDiskParent = "f:\VHDs\win2k8.vhd"

$VirtDiskSvc = Get-WmiObject -Class "Msvm_ImageManagementService" -Namespace "root\virtualization"

$VirtDiskSvc.CreateDifferencingVirtualHardDisk($VirtDiskPath, $VirtDiskParent)

Building on this, let’s create a complete script.

# Set up variables$VHD = "f:\VHDs\win2k8.vhd"

$GuestVM = "Win2k8"

$Namespace = "root\virtualization"

$Computer = "Hyper-V2k8"

# Get instance of Msvm_VirtualSystemManagementService class$VSMSvc = Get-WmiObject -Class "Msvm_VirtualSystemManagementService" -Namespace $Namespace -ComputerName $Computer

# Get instance of Msvm_ComputerSystem class$VM = Get-WmiObject -Namespace $Namespace -ComputerName $Computer -Query "Select * From Msvm_ComputerSystem Where ElementName='$GuestVM'"

#Associating Msvm_VirtualSystemSettingData class with $VM$VMVSSD = Get-WmiObject -Namespace $Namespace -Query "Associators of {$VM} Where ResultClass=Msvm_VirtualSystemSettingData AssocClass=Msvm_SettingsDefineState"

# Define instance of Virtual IDE controller through an association$VMIDECtrl = (Get-WmiObject -Namespace $Namespace -Query "Associators of ($VMVSSD) Where ResultClass=Msvm_ResourceAllocationSettingData AssocClass=Msvm_VirtualSystemSettingDataComponent"  | where-object -FilterScript {$_.ResourceSubType -eq "Microsoft Emulated IDE Controller" -and $_.Address -eq 0})

# Define capabilities of the disk resource$DiskAllocSet = Get-WmiObject -Namespace $Namespace -Query "SELECT * From Msvm_AllocationCapabilities

WHERE ResourceSubType = 'Microsoft Synthetic Disk Drive'"

# Define minimum, maximum, default, and incremental value for disk resource allocation$DefaultDiskDrive = (Get-WmiObject -Namespace $Namespace -Query "Associators of {$DiskAllocSet} Where ResultClass=Msvm_ResourceAllocationSettingData AssocClass=Msvm_SettingsDefineCapabilities" | where-object -FilterScript {$_.InstanceID -like "*&Default"})

# Define controller and address$DefaultDiskDrive.Parent = $VMIDECtrl._Path$DefaultDiskDrive.Address = 1

# Define new disk drive through AddVirtualSystemResources method of the Msvm_VirtualSystemManagementService class$NewDiskDrive = ($VSMSvc.AddVirtualSystemResource($VM._Path, $DefaultDiskDrive.PSBase.GetText(1))).NewResources

#Get Microsoft Virtual Hard Disk resource subtype$DiskAllocSet = Get-WmiObject -Namespace $Namespace -Query "SELECT * FROM Msvm_AllocationCapabilities WHERE ResourceSubType = 'Microsoft Virtual Hard Disk'"

# Get Microsoft Virtual Hard Disk instance and store in variable$DefaultHardDisk (Get-WmiObject -Namespace $Namespace -Query "Associators of {$DiskAllocSet} Where ResultClass=Msvm_ResourceAllocationSettingData AssocClass=Msvm_SettingsDefineCapabilities" | where-object -FilterScript {$_.InstanceID -like "*Default"})

# Define properties for our $DefaultHardDisk$DefaultHardDisk.Parent = $NewDiskDrive$DefaultHardDisk.Connected = $VHD

# Add $DefaultHardDisk to virtual machine$VSMSvc.AddVirtualSystemResources($VM._Path, $DefaultHardDisk.PSBase.GetText(1))

That should take care of create a virtual disk through WMI.  Next time, I will take a look at creating processor resources through WMI for Hyper-V.

Wednesday, October 07, 2009

ESX vs Windows Time Sync

Not sure if this is a common issue or if I just hit a perfect storm with an ESX host and a Windows guest OS. Here is how it played out……

We had an application that checks the time and date stamps between its host server and the database server that it writes to.  This is done to ensure accurate records in the database and all that fun stuff.  In any case, when the time difference falls outside of the pre-determined tolerance level, the application service shuts itself down, thereby disabling the application.  So far so good. This is what is should do.

When this started happening, I looked at how the clocks were set up. The Windows guest OS was configured to sync time and data information from a domain controller.(Ok, that’s good).  VMWare Tools in the guest OS had the time sync option unchecked. (Ok, that’s good too).  We know that the VMWare Time Sync option and the Windows Time Service do not recognize each other and in some cases can cause overcorrection of time.  Not the case here, but just a fact we are aware of.

Visually, everything looked good, so where did that leave me? I knew something was causing a discrepancy in the time, so I disabled the Windows Time Service and stopped it, then enabled the Time Sync option in VMWare tools.  As soon as I did that, the clock moved forward 13 minutes.  Hmm, that was the amount of time shown in our application logs as a difference in time between our application and the SQL database.  Interesting.

Talking with the VMWare engineer, they updated the ESX host clock to sync from the domain.  I re-enabled Windows Time Service and removed the Time Sync option from VMWare Tools set the guest OS back to its original state. The guest OS was rebooted, since it always gets the clock update at that time.  This time, it came up without our application service shutting down.  A couple other reboots confirmed the setting was good once again.

Lesson learned:

Apparently, in ESX server, even though a guest OS clock (Windows, for sure) is configured to sync with a domain clock source, it is apparently tunneled through ESX.  When this happens, the guest OS application thinks it is 10:00, but the time is being presented as 10:13.  At this point, I am not sure if it is presented this way going to the SQL server or if it is being translated coming back to the guest OS.  I have a hunch it is the latter, since the application is what complains about the time difference.

If anyone else has seen something similar, let me know.  This is really the first time I have run into this and other guests seem to run just fine with the same configuration.

Windows 7 Keyboard Shortcuts

Now that we are a couple of weeks away from the official retail launch date of Windows 7, I thought I would list out some of my favorite and most used keyboard shortcuts in this new operating system from Microsoft.  For me, the most used are grouped into 3 categories; General Windows 7, Display Shortcuts, and Display Magnifier Shortcuts.

General Windows 7

Windows logo key + Tab

Cycle through open programs on the taskbar using Aero Flip 3-D

For those not familiar with Aero Flip 3-D, this was introduced with Windows Vista, and functions much like the Alt + Tab feature, but performs it visually.  Eye candy, but nice.

Ctrl + Windows Logo key (+ Tab)

Hit the tab key once while holding the other two and then use the arrow keys to move the Aero Flip 3-D, then hit Windows Logo key to release.

Windows Logo key + Pause

Display the System Properties dialog box

Windows Logo key + D

Display the Desktop

Windows Logo key + M

Minimize all windows

Windows Logo key + Shift+M

Restore minimized windows

Windows Logo key + E

Open Computer Explorer

Windows Logo Key + R

Open Run dialog box

Display Shortcuts

Windows Logo Key + Spacebar

Look at the desktop without minimizing/closing application

Windows Logo key + Shift + (Left Arrow or Right Arrow)

Moves active window from one screen to another in multi-monitor configurations

Windows Logo key + PChoose a display presentation mode

Shift+Click taskbar item

Opens a new instance of the item

Display Magnifier Shortcuts

Windows Logo key + (+ or – key)

Screen Zoom in or out

Ctrl + Alt + F

Switch to Full Screen

Ctrl + Alt + L

Switch to Lens mode

Ctrl + Alt + D

Switch to Docked mode

Ctrl + Alt + I

Invert colors

Ctrl + Alt + arrow keys

Pan in the direction of the arrow key

Windows logo key + Esc

Exit Magnifier

Thursday, August 13, 2009

The Holding Pattern: Lessons Learned on Litigation Holds « Bow Tie Law’s Blog

Ran across this post on the Bow Tie Law Blog talking about some items from the Napster case and Fawn Hall (you know, Ollie North) along with some of their own thoughts around litigation hold and litigation hold letters.

Very interesting read showing the need to have finely crafted and implemented policies and procedures.

The Holding Pattern: Lessons Learned on Litigation Holds « Bow Tie Law’s Blog

Wednesday, August 12, 2009

Viewing mailbox sizes in Exchange 2007

As I was running a mailstorm against my Exchange 2007 virtual environment, I noticed that for some reason I had a few mailboxes that were missed in the random seeding that was happening.  I didn’t really care that these were missed, since I already had a system configuration of around 1500 mailboxes.  I mean really, who needs more for a test environment.

Anyway, I wanted to get rid of these non-populated mailboxes, but with 1500 mailboxes, I did not want to go through each and every mailbox within Exchange Management Console and hit properties to see if there was data contained in the selected mailbox.  Under Exchange 2003, Microsoft gave us a great pair of columns (Size and Total Items).  In Exchange 2007, Microsoft removed this and I have not seen nor heard any movement to bring it back.

In any case, I needed a way to get a list of the mailboxes showing me this information.  Fortunately, Exchange Management Shell provide a way to do this via the Powershell cmdlet Get-MailboxStatistics.  Here is what I ended up using to generate this and send to the screen.  I played a little with Export-CSV, but was not able to get the proper data in the file, so I left the sort with smallest mailboxes at the bottom.

Get-MailboxStatistics | Sort-Object TotalItemSize -Descending | ft DisplayName,@{label=”TotalItemSize(MB)”;expression={$_.TotalItemSize.Value.ToMB()}},ItemCount

This will output a list of all of mailboxes sorted by Item Size and Item Count (highest to lowest).  This makes it easy enough for me to get a list of my non-populated mailboxes to remove them from the system.  I have also used this to remove my larger mailboxes to free up some disk space in my test environment.

Thursday, August 06, 2009

DDOS Attack Against Facebook, Twitter, Et Al. Was Because of One Guy's LiveJournal [DoS]

Check this post DDOS Attack Against Facebook, Twitter, Et Al. Was Because of One Guy's LiveJournal [DoS] from Gizmodo:

According to a Facebook executive, the target of today's DDOS attacks on Twitter, Facebook, LiveJournal, YouTube and other social media sites was one pro-Georgian blogger going by the username of "Cyxym." No word as to who was behind the attack.


Earlier today several competing social networks banded together to fight the DDOS attacks on their respective properties. Google and Facebook were able to keep the effects minimal while Twitter and others suffered periodic outages and severe slowness through out the day.

Max Kelly, chief security officer at Facebook, explained that the attack specifically targeted Cyxym, and was directed toward websites which he frequented or on which he held accounts, including his LiveJournal, where we find the first suggestion that there was a big target painted on his virtual back:

Cyxymu's LiveJournal page wasn't accessible, but a cached version showed that it was updated on Thursday with a message about the denial of service (DOS) attacks on his accounts on the US-based sites. "Now it's obvious it's a special attack against me and Georgians," the message in Russian said.

There is no word on exactly who was behind this attack and Kelly declined to speculate. But we wonder: Did Cyxym have a Gizmodo commenter account too or was the DDOS attack on Gawker Media an entirely unrelated coincidence? [CNET]


Windows 7 RTM available

The moment many of us geeky types have been waiting for.

Windows 7 RTM and its' many versions showed up TechNet Plus subscriptions today. Still waiting for Windows Server 2008 R2 to show up, but in any case, I will be grabbing this tonight and upgrading the home computer from the earlier build of Windows 7.

Tuesday, July 28, 2009

Another great PeopleBrowsr feature

A bit earlier today, I had been retweeting a number of articles and quotes on Twitter.  An Eddie Izzard quote prompted a response from @TalonNYC.  I will admit, on first look, the response seemed a bit non-sensical, because there was no context around which update he was responding to.

I have played with a number of Twitter clients, like TweetDeck, Seesmic, Sobees, bDule, and my latest toy, PeopleBrowsr.  All of these are Adobe AIR applications and some have web-interfaces as well.  Anyway, I received this response from @TalonNYC.

image

Nothing in the response to let me know which update he was responding to, right?

At this point in playing with PeopleBrowsr, I have not yet explored all features available, but I chose to explore the callout highlighted below.

image

When I clicked on this callout, the response expanded to show which update he was responding to, which helped put some context around the response.

image

I don’t recall any of the other Twitter clients supporting this, but then again, I don’t recall looking for this specifically, either.  For now, I am sticking with PeopleBrowsr, but if anyone can confirm or deny this ability in the other, let me know.

As I run across other things I find useful in PeopleBrowsr, I will post them for all.  See you all with the rest of the twits, uh, tweeters.

Thursday, July 02, 2009

Hyper-V Lab (My Rig) – Part III

In Part I, I discussed my hardware and my general concept of what I was going to build.  Part II discussed adding the Hyper-V Role to a Windows Server 2008 machine to become the host.  Part III will cover some different ways of creating VMs for use in your new Hyper-V host.

As with any hypervisor or VM environment, we need to be able to build fresh images to virtualize.  This is pretty easy with Hyper-V Manager that is installed when you enable the Hyper-V Role.  When you open up Server Manager, under Roles, you will find the newly enabled Hyper-V.

image

When you select the Hyper-V server under Hyper-V Manager, you will see the following panel open up on the right of the console.

image

From here you can modify the General Hyper-V setting along with creating Virtual Networks that the VMs will use.  First, we will take a look at the Hyper-V Settings.

image

image

The first option is where will your Virtual Hard Disks be placed and accessed from.  The option just below that is where will your Virtual Machines be placed and accessed from.  You will see in my example, that I have place Virtual Hard Disks in their own subfolder under my Hyper-V root, but my Virtual Machines are being placed at the Hyper-V root level.  First, when Hyper-V create VMs, it does not create friendly names for the Virtual Machines on disk.  Friendly names are available in the console, but that is not how they are stored.  The filenames created with same information that Hyper-V tracks everything internally and that is through GUIDs.  So, for me, having a simple path to store the Virtual Machines configurations was the way to go.  Each VM get’s its’ own folder created labeled with the GUID along with a configuration file with the same label.

The next four option under User I tend to just leave alone.  You can change them if you want, but I have not found a reason to mess with them yet.  Click OK to save the changes.

Now onto the Virtual Network Manager.

image

image

Under Virtual Networks, select New virtual network and you will see three options; External, Internal, and Private.  External will use the physical network card for access to the network. Internal will allow connections only between the VMs and the VMs to the host.  Private will allow connections between VMs only.  You will see in my example, that I have set up an Internal and an External connection.  I typically use this configuration for enabling network access through a gateway VM in my lab.

There is also an option for stamping a VLAN ID on these segments if you are routing by VLAN.  Click OK to save and close.

Time to build a VM…….

Click on New\Virtual Machine

image

This will open the virtual machine wizard.

image

Click Next.

image

Give the VM a name.  This name is what will be displayed in the console.  If you wish to store the VM somewhere else beside the default location set earlier, check the box and change the location.  Hit Next.

image

Specify how much memory you wish to assign to your VM. Hit Next.

image

Choose the network to use for this VM. Hit Next.

image

Choose a name for the Virtual Disk (or just leave the pre-assigned) and location along with general size.  The disk will dynamically grow up to this size.  Hit Next.

image

Choose if you would like to install the operating system later, from a CD/DVD, ISO image, floppy disk, or network install.  I typically have everything in ISO, so that is what is always use.  Hit Next.

image

The summary screen shows the options you chose.  Hit Finish to create the virtual machine.  The VM is created and you will have a console with your new VM.

image

Here is mine with a few VMs in place and one of them running.

Yeah, I know.  That’s great David, but what if I have some virtual machines from VMWare that I want to load up into Hyper-V.  Not a problem,  VMTookit has created a tool that will take your VMDK files from VMWare and convert them to VHD format that Hyper-V can use.  You can download Vmdk2Vhd from their website.  Place the newly created VHDs into your Virtual Disk folder for Hyper-V.

All that is left is to create a New Virtual Machine using the steps above, but when it comes to selecting a Virtual Hard Disk, select them as below.

image

Point to the newly created VHD and continue on.

TADA! You have just create a new VM that uses your old VMWare image.

Once you have your images in the console, right-click on them and select Start.  Once they start running, right-click on it and select Connect to open up the server console to work with it.

Next time we look at the value of exporting and importing virtual machines in Hyper-V.

Hyper-V Lab (My Rig) – Part II

Now that I have had a chance to get the rig built from Part I and things installed, let me take Part II and step it out.

One thing to note on this build.  I chose to go with a Full Standard installation of Windows Server 2008 R2.  I could have gone with a Core installation, but decided I wanted the GUI.  I will have a Core install in a VM as time permits.

First thing to do is once you have Windows Server 2008 installed, we need to Add a Role from the Initial Configuration Tools screen.

Add Role

When you select this option, the New Role Wizard is launched, which makes this pretty easy.

NewRoleWizardStep1

Click Next.

NewRoleWizardStep2

Select Hyper-V.  You can select other Roles as well, but be careful so that you don’t overload your system.  Remember, you will be loading this thing up with many concurrent VMs running and need to ensure resources for those.

NewRoleWizardStep3

Here you can get some additional information on Hyper-V, but really, who takes the time to read through this stuff.

NewRoleWizardStep4

Now, we need to select a network adapter that Hyper-V will use to virtualize in the VMs.  My machine only has one, so this makes it a no-brainer.

NewRoleWizardStep5

You get a little information screen saying you might need to reboot after install. Blah, Blah, Blah.

NewRoleWizardStep6

Well, sure enough……I need to reboot.

NewRoleWizardContinuedAfterReboot1

After the reboot, the Hyper-V Role installation continues

NewRoleWizardContinuedAfterReboot2

Congratulations! Hyper-V is installed.  You get a little note saying how to add VMs.

Tuesday, June 23, 2009

Hyper-V Lab (My Rig) – Part I

Well, I decided after reading through Andrew Connell’s post about his Hyper-V system build along with Bob Fox’s post about his build for Hyper-V, that I needed to just get on it and build up mine.  For my build, I am taking something of a hybrid approach of these two.

In this first part, I will discuss my planning (why I need the rig and requirements).  As an MCT (Microsoft Certified Trainer), I need to stay on top of the latest technology, especially for those classes I teach.  This is currently Windows Server, Exchange, and Visual Studio courses, along with project management classes.  In the past, I have used MS Virtual Server, MS Virtual PC, and VMWare Workstation to support my lab machines.  I won’t even go into my early days of Ghosting machine images.

I decided I wanted to have a separate machine for my lab environment.  I was getting tired of the dual-boot situation, but booting from a VHD (virtual disk) on my Windows 7 machine was pretty cool.  I decided to look around for a system case that I may have had lying around and use that as the basis for my research.  I found a small micro ATX and a mini ITX case.  The mini ITX case was going to be way to small to support my CPU and memory requirements, so that left me with the micro ATX case.  The power supply was still intact, which is a feat all of its own, since I cannibalize my systems when building other computers.

Now that I had the case, time for some research around my requirements.  Since I would be running 3-4 VMs at a time, I wanted to set aside 1 core per VM.  This is not really required, but more of a practice I have taken on for lab environments.  I also knew that I would need 8-16GB of memory to support the VMs and host OS.  Guess I should mention that I am cheap too, so I had to watch what I was spending.

After much research and toggling between Gigabyte and ASUS micro ATX boards, I finally decided on the ASUS M3A78-CM.  This board sports  (6) SATA ports, support for 8GB of memory and supports AMD Phenom and Phenom II processors.  Why did I chose AMD over Intel? To be honest, it was a price decision.  Both comparable AMD and Intel processors support their own form of virtualization (AMD-V and Intel VT), which is required for the Hyper-V role.  I also went with the AMD Phenom X4 9750.  This is a quad-core processor running at 2.4 or 2.6GHz (I can’t remember exactly)

Anyway, I have decided to go with 4 sticks of 2GB DDR2 for this board to give me a total of 8GB and max it out.  I would have gone with a system board that supports 16GB or 32GB, but the 4GB sticks of memory are just a bit too pricey and by the time that price changes enough for me, I will be ready to upgrade the machine anyway.

I already have the 1TB SATA drive to hold my VMs, so I just need a smaller SATA drive for my OS and applications.  A 160-250GB drive should take care of that.  Next up is to procure the parts, build the system and start the install.  That will be in the next installment of this build.  Stay tuned.

Saturday, June 20, 2009

Oracle Kills Virtual Iron (Another one bites the dust)

Saw this over on Slashdot. Seriously, Oracle needs to get a grip on their virtualization practice.Check this post Oracle Kills Virtual Iron from Slashdot:

rhathar writes in with news that Oracle is killing off the products of Virtual Iron, a month after purchasing the company. Reports say that all but 10 to 15 staff were let go. The Reg article speculates that Oracle bought VI for its technology and considers its customers and partners expendable. When the Sun purchase finalizes, Oracle will be in possession of three separate virtualization technologies all based on Xen. "In a letter to Virtual Iron's sales partners, Oracle says it 'will suspend development of existing Virtual Iron products and will suspend delivery of orders to new customers.' One partner said, 'So basically, anyone that built their hosting infrastructure on VI... is now totally in the s–.'"


Read more of this story at Slashdot.

Friday, June 19, 2009

Windows 7 Gadgets Stop Working

Earlier today I was installing some software on my machine, listening to XM Radio through a desktop gadget as I often do, when the music stopped.  I didn’t think much about it, since at times my music streams can be bandwidth challenged.  Well, after the install I went back out to my desktop and saw that all of my gadgets were gone.

I checked task manager, and sidebar.exe was not running.  Aha, there’s the problem. I fired up C:\Program Files\Windows Sidebar\sidebar.exe. A little disk activity and sidebar.exe process lit up in Task Manager, then just as quickly disappeared.  A peek into event viewer game me this:

Faulting application name: sidebar.exe, version: 6.1.7100.0, time stamp: 0x49ee9780
Faulting module name: kernel32.dll, version: 6.1.7100.0, time stamp: 0x49eeaac7
Exception code: 0xc0000005
Fault offset: 0x0000000000003892
Faulting process id: 0x13b4
Faulting application start time: 0x01c9f11eac6dc107
Faulting application path: C:\Program Files\Windows Sidebar\sidebar.exe
Faulting module path: C:\Windows\system32\kernel32.dll

What does that mean?!?!?! A quick Bing search did not really provide much insight, except that many people had this problem with UAC being turned off.  Not so much the case here.  Coincidentally, one of the reports I saw was written about the same time my problem first started today.  UAC checked out, reboots did not fix the problem, but this person was having the very same issue.

I can’t imagine it was the software being installed….just not feasible.  Freaky, if that was the case. I quickly turned focus to Windows Updates and using System Restore, I rolled back to a point prior to yesterday’s critical update.  After the reboot, my gadgets were back and everything is working perfect again.  I don’t know if there was something specific about the update that occurred, but the gadgets were there and working earlier in the day.

Thursday, June 18, 2009

Microsoft's Browser Comparison Chart

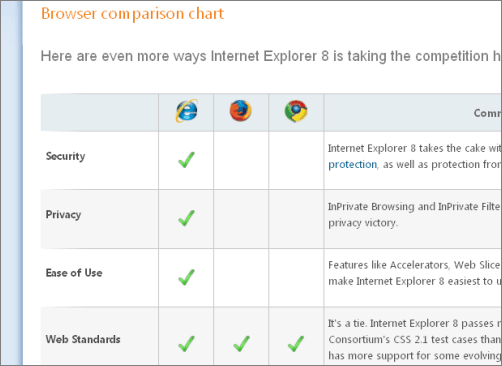
Check this post Microsoft's Browser Comparison Chart from Google Blogoscoped:


Microsoft has a “Get the facts” page for Internet Explorer 8. As you can see, Internet Explorer has security, privacy, and ease of use, whereas Firefox and Chrome don’t have those. Gotta love some old-fashioned propaganda. [Via Reddit.]