Showing posts with label Microsoft. Show all posts

Thursday, January 07, 2010

Windows 7 God Mode - Um, yeah....not really

Over the last week or so, I have been seeing a number of posts (Twitter, Facebook, blogs) talking about gaining access to hidden features in Windows 7 that has been termed "God Mode".  Some have even called it "Super Admin" mode.  After seeing all of these posts and realizing that many have moved directly into Windows 7 or migrated from Windows XP, they do not realize that this "feature" was available in Windows Vista as well.

Let's first show how we gain access to it then we will kill the rumor and lay it out for what this "God Mode" really is.

In order to get access to this you simply do the following:

  • Open C:
  • Create a new Folder
  • Rename the folder name to GodMode.{ED7BA470-8E54-465E-825C-99712043E01C}
  • Browse all the wonderful things Windows 7 can do for you

Ok, as far as the folder name, you could name it FooBar. or David. or whatever.  The piece that makes this work is the {ED7BA470-8E54-465E-825C-99712043E01C}.  What exactly is this?  You may say it looks like a GUID used in Windows and found in the registry.  Yup. That is exactly what it is.

So, what exactly is this telling us? The folder name we used is basically a reference to the GUID listed in the registry.  The System.AppUserModel.ID is pointing to ControlPanel. When we open the new folder, it is simply opening a link to Control Panel and displaying the items in a list view.

Here is a listing of what the new "God Mode" displays.

In the end, there is no "God Mode" or "Super Admin" mode, only a different view to your Control Panel.  Oh, this was also available in Windows Vista, so it is not even a new thing.  It just goes to show how popular Windows 7 is turning out to be.

Friday, October 23, 2009

Hyper-V Automation through scripts (Final Script)

Ok, so far we have created, modified, and added resources (memory, processor, disks, and network) to virtual machines.  Now, we want to take that information and build a complete virtual machine.

# Set up variables
$VHD = "f:\VHDs\win2k8.vhd"
$GuestVM = "Win2k8"
$Namespace = "root\virtualization"
$Computer = "HyperV"
$VHDSize = "10GB"
$VMSwitchName = "Hyper-V External Switch"
$VMSwitchPortName = "MyPort"
$VMNICAddress = "00155D9290FF"

$VMSvc = Get-WmiObject -class "Msvm_VirtualSystemManagementService" -namespace $Namespace -ComputerName $Computer
$VM = Get-WmiObject -Namespace $Namespace -ComputerName $Computer -Query "Select * From Msvm_ComputerSystem Where ElementName='$GuestVM'"
$VMSettingData = Get-WmiObject -Namespace $Namespace -Query "Associators of {$VM} Where ResultClass=Msvm_VirtualSystemSettingData AssocClass=Msvm_SettingsDefineState"

# Give the new virtual machine a name
$VMGlobalSettingClass = [WMIClass]"\\$Computer\root\virtualization:Msvm_VirtualSystemGlobalSettingData"

$NewVMGS = $VMGlobalSettingClass.psbase.CreateInstance()

while ($NewVMGS.psbase.Properties -eq $null) {}

$NewVMGS.psbase.Properties.Item("ElementName").value = $GuestVM

# Create  a virtual disk
$VMDiskSvc = Get-WmiObject -Class "Msvm_ImageManagementService" -Namespace "root\virtualization"

$DiskCreate = $VMDiskSvc.CreateFixedVirtualHardDisk($VHD, 10GB)
$DiskJob = [WMI]$DiskCreate.job

while (($DiskJob.JobState -eq "2") -or ($DiskJob.JobState -eq "3") -or ($DiskJob.JobState -eq "4")) {Start-Sleep -m 100 $DiskJob = [WMI]$DiskCreate.job}

#Create memory resource
$VMMem = (Get-WmiObject -Namespace $Namespace -Query "Associators of {$VMSettingData} Where ResultClass = Msvm_VirtualSystemSettingDataComponent" | where-object -FilterScript {$_.ResourceSubType -eq "Microsoft Virtual Machine Memory"})

$VMMem.VirtualQuantity = [string]2048
$VMMem.Reservation = [string]2048
$VMMem.Limit = [string]2048

# Create processor resource
$VMProc = (Get-WmiObject -Namespace $Namespace -Query "Associators of {$VMSettingData} Where ResultClass = Msvm_ProcessorSettingData" | where-object -FilterScript {$_.ResourceSubType -eq "Microsoft Processor"})

$VMProc.VirtualQuantity = [string]1
$VMProc.Reservation = [string]0
$VMProc.Limit = [string]100000
$VMProc.Weight = [string]100

# Create network interface
$DefaultNet = Get-WmiObject -Namespace $Namespace -Class Msvm_SyntheticEthernetPortSettingData | Where-Object -FilterScript {$_.InstanceID -like "*Default*"}

$GUID1 = [GUID]::NewGUID().ToString()
$GUID2 = [GUID]::NewGUID().ToString()

$VMSwitchQuery = Get-WmiObject -Class "Msvm_VirtualSwitchManagementService" -Namespace $Namespace

# $VMSvc = Get-WmiObject -Class "Msvm_VirtualSystemManagementService" -namespace $Namespace -ComputerName $Computer

$VMSwitch = Get-WmiObject -Namespace $Namespace -Query "Select * From Msvm_VirtualSwitch Where ElementName = '$VMSwitchName'"

$ReturnObject = $VMSwitchQuery.CreateSwitchPort($VMSwitch, [guid]::NewGuid().ToString(), $VMSwitchPortName, "")
$NewSwitchPort1 = $ReturnObject.CreatedSwitchPort

$ReturnObject = $VMSwitchQuery.CreateSwitchPort($VMSwitch, [guid]::NewGUID().ToString(), $VMSwitchPortName, "")
$NewSwitchPort2 = $ReturnObject.CreatedSwitchPort

$StaticNet = $DefaultNet.psbase.Clone()
$StaticNet.VirtualSystemIdentifiers = "{GUID1}"
$StaticNet.StaticMacAddress = $true
$StaticNet.Address = $VMNICAddress
$StaticNet.Connection = $NewSwitchPort1

$DynNet = $DefaultNet.psbase.Clone()
$DynNet.VirtualSystemIdentifiers = "{GUID2}"
$DynNet.Connection = $NewSwitchPort2

#Add the network interface resources to Resource Allocation Settings
$VMRASD = @()

$VMRASD += $StaticNet.psbase.gettext(1)
$VMRASD += $DynNet.psbase.gettext(1)
$VMRASD += $VMMem.psbase.gettext(1)
$VMRASD += $VMProc.psbase.gettext(1)

# Time to create the virtual machine
$VMSvc.DefineVirtualSystem($NewVMGS.psbase.GetText(1), $VMRASD)

# Add our disk to the virtual machine
# $VM = Get-WmiObject -Namespace $Namespace -ComputerName $Computer -Query "Select * From Msvm_ComputerSystem Where ElementName = '$GuestVM'"

# $VMSettingData = Get-WmiObject -Namespace $Namespace -Query "Associators of {$VM} Where ResultClass = Msvm_VirtualSystemSettingData AssocClass = Msvm_SettingsDefineState"

$VMIDECtrl = (Get-WmiObject -Namespace $Namespace -Query "Associators of {$VMSettingData} Where ResultClass = Msvm_ResourceAllocationSettingData AssocClass = Msvm_VirtualSystemSettingDataComponent" | where-object -FilterScript {$_.ResourceSubType -eq "Microsoft Emulated IDE Controller" -and $_.Address -eq 0})

$DiskAllocationSetting = Get-WmiObject -Namespace $Namespace -Query "Select * From Msvm_AllocationCapabilities Where ResourceSubType = 'Microsoft Synthetic Disk Drive'"

$DefaultDiskDrive = (Get-WmiObject -Namespace $Namespace -Query "Associators of {$DiskAllocationSetting} Where ResultClass = Msvm_ResourceAllocationSettingData AssocClass = Msvm_SettingsDefineCapabilities" | where-object -FilterScript {$_.InstanceID -like "*Default*"})

$DefaultDiskDrive.Parent = $VMIDECtrl._Path

$DefaultDiskDrive.Address = 0

$NewDiskDrive = ($VMSvc.AddVirtualSystemResources($VM._Path, $DefaultDiskDrive.PSBase.GetText(1))).NewResources

$DiskAllocationSetting = Get-WmiObject -Namespace $Namespace -Query "Select * From Msvm_AllocationCapabilities Where ResourceSubType = 'Microsoft Virtual Hard Disk'"

$DefaultHardDisk =  (Get-WmiObject -Namespace $Namespace -Query "Associators of {$DiskAllocationSetting} Where ResultClass = Msvm_ResourceAllocationSettingData AssocClass = Msvm_SettingsDefineCapabilities" | where-object -FilterScript {$_.InstanceID -like "*Default"})

$DefaultHardDisk.Parent = $NewDiskDrive
$DefaultHardDisk.Connection = $VHD

$VMSvc.AddVirtualSystemResources($VM._Path, $DefaultHardDisk.PSBase.GetText(1))

#Now, we add a DVD
$DVDAllocationSetting = Get-WmiObject -Namespace $Namespace -Query "Select * From Msvm_AllocationCapabilities Where ResourceSubType = 'Microsoft Synthetic DVD Drive'"

$DefaultDVDDrive = (Get-WmiObject -Namespace $Namespace -Query "Associators of {$DVDAllocationSetting} Where ResultClass = Msvm_ResourceAllocationSettingData AssocClass = Msvm_SettingsDefineCapabilities" | where-object -FilterScript {$_.InstanceID -like "*Default"})

$DefaultDVDDrive.Parent = $VMIDECtrl._Path

$DefaultDVDDrive.Address = 1

$NewDVDDrive = $DefaultDVDDrive.psbase.Clone()

$VMSvc.AddVirtualSystemResources($VM._Path, $NewDVDDrive.psbase.GetText(1))

In this code, I am using a data array to contain all of the resources that will be used to create the virtual machine.

$VMRASD = @()

$VMRASD += $StaticNet.psbase.gettext(1)
$VMRASD += $DynNet.psbase.gettext(1)

You will notice that the hard disk and DVD drive are not included in this array.  This is because they are added to a virtual IDE port.  These ports do not exist until after the virtual machine is created, so we add them after it is.

That wraps up this session for automating Hyper-V virtual machine creation through scripts.  As always, any comments or questions, let me know.

Monday, October 19, 2009

Hyper-V Automation through scripts (Memory)

Last time I looked at building onto our WMI automation script with processor creation.  Today, I want to cover how to add memory resources into the script.  Once again, I will take advantage of the existing patterns for creating this script.

# Set up variables$VHD = "f:\VHDs\win2k8.vhd"

$GuestVM = "Win2k8"

$Namespace = "root\virtualization"

$Computer = "Hyper-V2k8"

# Get instance of Msvm_VirtualSystemManagementService class$VSMSvc = Get-WmiObject -Class "Msvm_VirtualSystemManagementService" -Namespace $Namespace

-ComputerName $Computer

# Get instance of Msvm_ComputerSystem class$VM = Get-WmiObject -Namespace $Namespace -ComputerName $Computer -Query "Select * From

Msvm_ComputerSystem Where ElementName='$GuestVM'"


#Associating Msvm_VirtualSystemSettingData class with $VM$VMVSSD = Get-WmiObject -Namespace $Namespace -Query "Associators of {$VM} Where

ResultClass=Msvm_VirtualSystemSettingData AssocClass=Msvm_SettingsDefineState"


# Define instance of Virtual IDE controller through an association$VMMEM = (Get-WmiObject -Namespace $Namespace -Query "Associators of ($VMVSSD) Where

ResultClass=Msvm_MemorySettingData AssocClass=Msvm_VirtualSystemSettingDataComponent"


| where-object -FilterScript {$_.ResourceSubType -eq "Microsoft Virtual Machine Memory"})

# Define memory resource attributes# set amount of memory (in megabytes)$VMMem.VirtualQuantity = [string]2048# set other attributes that are viewable in Hyper-V manager$VMMem.Reservation = [string]2048$VMMem.Limit = [string]2048

$VSMSvc.ModifyVirtualSystemResources($VM._Path, $VMMem.PSBase.GetText(1))

There you go. Memory has been defined and created for the virtual machine.  Next time, I will add a network resource via WMI.

Wednesday, October 07, 2009

Windows 7 Keyboard Shortcuts

Now that we are a couple of weeks away from the official retail launch date of Windows 7, I thought I would list out some of my favorite and most used keyboard shortcuts in this new operating system from Microsoft.  For me, the most used are grouped into 3 categories; General Windows 7, Display Shortcuts, and Display Magnifier Shortcuts.

General Windows 7

Windows logo key + Tab

Cycle through open programs on the taskbar using Aero Flip 3-D

For those not familiar with Aero Flip 3-D, this was introduced with Windows Vista, and functions much like the Alt + Tab feature, but performs it visually.  Eye candy, but nice.

Ctrl + Windows Logo key (+ Tab)

Hit the tab key once while holding the other two and then use the arrow keys to move the Aero Flip 3-D, then hit Windows Logo key to release.

Windows Logo key + Pause

Display the System Properties dialog box

Windows Logo key + D

Display the Desktop

Windows Logo key + M

Minimize all windows

Windows Logo key + Shift+M

Restore minimized windows

Windows Logo key + E

Open Computer Explorer

Windows Logo Key + R

Open Run dialog box

Display Shortcuts

Windows Logo Key + Spacebar

Look at the desktop without minimizing/closing application

Windows Logo key + Shift + (Left Arrow or Right Arrow)

Moves active window from one screen to another in multi-monitor configurations

Windows Logo key + PChoose a display presentation mode

Shift+Click taskbar item

Opens a new instance of the item

Display Magnifier Shortcuts

Windows Logo key + (+ or – key)

Screen Zoom in or out

Ctrl + Alt + F

Switch to Full Screen

Ctrl + Alt + L

Switch to Lens mode

Ctrl + Alt + D

Switch to Docked mode

Ctrl + Alt + I

Invert colors

Ctrl + Alt + arrow keys

Pan in the direction of the arrow key

Windows logo key + Esc

Exit Magnifier

Wednesday, August 12, 2009

Viewing mailbox sizes in Exchange 2007

As I was running a mailstorm against my Exchange 2007 virtual environment, I noticed that for some reason I had a few mailboxes that were missed in the random seeding that was happening.  I didn’t really care that these were missed, since I already had a system configuration of around 1500 mailboxes.  I mean really, who needs more for a test environment.

Anyway, I wanted to get rid of these non-populated mailboxes, but with 1500 mailboxes, I did not want to go through each and every mailbox within Exchange Management Console and hit properties to see if there was data contained in the selected mailbox.  Under Exchange 2003, Microsoft gave us a great pair of columns (Size and Total Items).  In Exchange 2007, Microsoft removed this and I have not seen nor heard any movement to bring it back.

In any case, I needed a way to get a list of the mailboxes showing me this information.  Fortunately, Exchange Management Shell provide a way to do this via the Powershell cmdlet Get-MailboxStatistics.  Here is what I ended up using to generate this and send to the screen.  I played a little with Export-CSV, but was not able to get the proper data in the file, so I left the sort with smallest mailboxes at the bottom.

Get-MailboxStatistics | Sort-Object TotalItemSize -Descending | ft DisplayName,@{label=”TotalItemSize(MB)”;expression={$_.TotalItemSize.Value.ToMB()}},ItemCount

This will output a list of all of mailboxes sorted by Item Size and Item Count (highest to lowest).  This makes it easy enough for me to get a list of my non-populated mailboxes to remove them from the system.  I have also used this to remove my larger mailboxes to free up some disk space in my test environment.

Tuesday, June 23, 2009

Hyper-V Lab (My Rig) – Part I

Well, I decided after reading through Andrew Connell’s post about his Hyper-V system build along with Bob Fox’s post about his build for Hyper-V, that I needed to just get on it and build up mine.  For my build, I am taking something of a hybrid approach of these two.

In this first part, I will discuss my planning (why I need the rig and requirements).  As an MCT (Microsoft Certified Trainer), I need to stay on top of the latest technology, especially for those classes I teach.  This is currently Windows Server, Exchange, and Visual Studio courses, along with project management classes.  In the past, I have used MS Virtual Server, MS Virtual PC, and VMWare Workstation to support my lab machines.  I won’t even go into my early days of Ghosting machine images.

I decided I wanted to have a separate machine for my lab environment.  I was getting tired of the dual-boot situation, but booting from a VHD (virtual disk) on my Windows 7 machine was pretty cool.  I decided to look around for a system case that I may have had lying around and use that as the basis for my research.  I found a small micro ATX and a mini ITX case.  The mini ITX case was going to be way to small to support my CPU and memory requirements, so that left me with the micro ATX case.  The power supply was still intact, which is a feat all of its own, since I cannibalize my systems when building other computers.

Now that I had the case, time for some research around my requirements.  Since I would be running 3-4 VMs at a time, I wanted to set aside 1 core per VM.  This is not really required, but more of a practice I have taken on for lab environments.  I also knew that I would need 8-16GB of memory to support the VMs and host OS.  Guess I should mention that I am cheap too, so I had to watch what I was spending.

After much research and toggling between Gigabyte and ASUS micro ATX boards, I finally decided on the ASUS M3A78-CM.  This board sports  (6) SATA ports, support for 8GB of memory and supports AMD Phenom and Phenom II processors.  Why did I chose AMD over Intel? To be honest, it was a price decision.  Both comparable AMD and Intel processors support their own form of virtualization (AMD-V and Intel VT), which is required for the Hyper-V role.  I also went with the AMD Phenom X4 9750.  This is a quad-core processor running at 2.4 or 2.6GHz (I can’t remember exactly)

Anyway, I have decided to go with 4 sticks of 2GB DDR2 for this board to give me a total of 8GB and max it out.  I would have gone with a system board that supports 16GB or 32GB, but the 4GB sticks of memory are just a bit too pricey and by the time that price changes enough for me, I will be ready to upgrade the machine anyway.

I already have the 1TB SATA drive to hold my VMs, so I just need a smaller SATA drive for my OS and applications.  A 160-250GB drive should take care of that.  Next up is to procure the parts, build the system and start the install.  That will be in the next installment of this build.  Stay tuned.

Thursday, June 18, 2009

Microsoft's Browser Comparison Chart

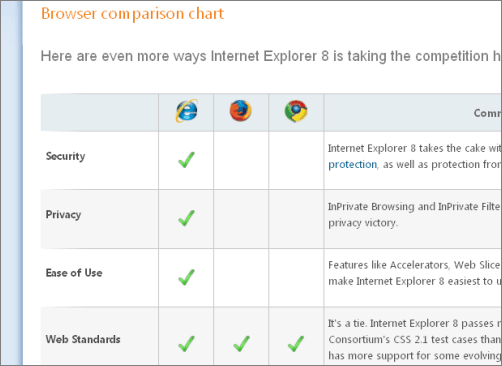
Check this post Microsoft's Browser Comparison Chart from Google Blogoscoped:


Microsoft has a “Get the facts” page for Internet Explorer 8. As you can see, Internet Explorer has security, privacy, and ease of use, whereas Firefox and Chrome don’t have those. Gotta love some old-fashioned propaganda. [Via Reddit.]